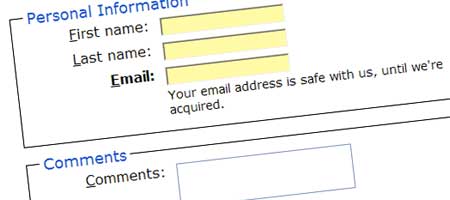
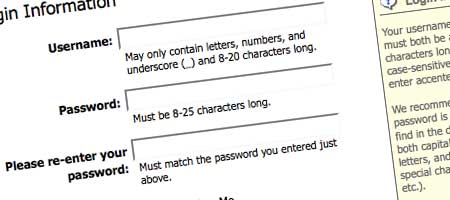
- Forms markup and CSS - Revisited
- CSSPlay - A form with style

- Clean and pure CSS FORM design
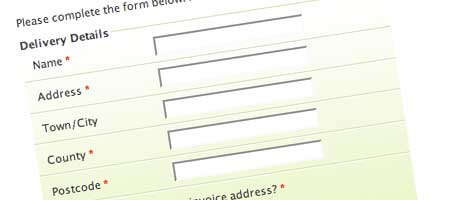
- Tips For Creating Great Web Forms

- Fancy Form Design Using CSS
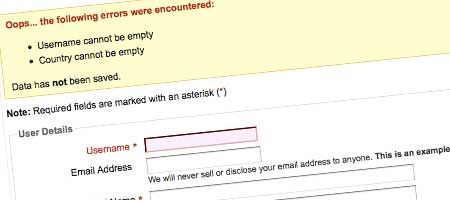
- A Prettier Accessible Forms
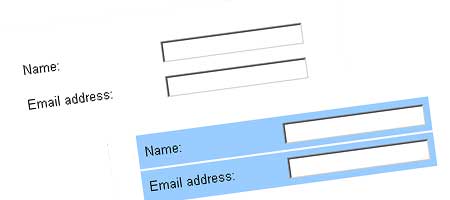
- Using CSS to Create a Two-Column Layout
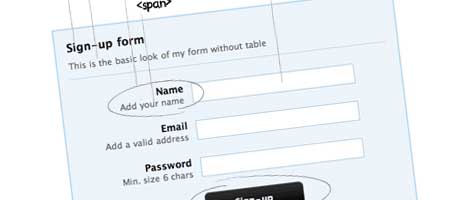
- CSS-Only, Table-less Forms
- Pretty Up Your Forms with CSS
- Semantic Horizontal Forms

- Fun with forms- Customized Input Elements
- A CSS Collection for Web Forms

Tuesday, December 29, 2009
12 useful ways to Style Web Forms
Create a jQuery Popup Bubble

Learn how to add a cool popup bubble to an RSS feed link using jQuery.
View Demo
Javascript
$(document).ready(function(){

$(".rss-popup a").hover(function() {
$(this).next("em").stop(true, true).animate({opacity: "show", top: "-60"}, "slow");
}, function() {
$(this).next("em").animate({opacity: "hide", top: "-70"}, "fast");
});

});
HTML
<div class="rss-popup">
<a href="feed-link" id="rss-icon">RSS Feed</a>
<em>Subscribe to our RSS Feed</em>
</div>
CSS
.rss-popup {
margin: 100px auto;
padding: 0;
width: 100px;
position: relative;
}

div.rss-popup em {
background: url(bubble.png) no-repeat;
width: 100px;
height: 49px;
position: absolute;
top: -70px;
left: -0px;
text-align: center;
text-indent: -9999px;
z-index: 2;
display: none;
}

#rss-icon {
width: 42px;
height: 42px;
background: url(icon.png) no-repeat 0 0;
text-indent: -9999px;
margin: 0 auto;
display: block;
}
View Demo
Removing The Dotted Outline
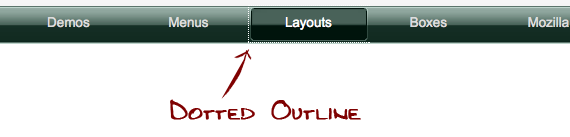
Anchor links (<a>’s) by default have a dotted outline around them when the become “active” or “focused”. In Firefox 3, the color is determined by the color of the text. I believe in previous versions and in some other browsers it is by default gray. This is default styling for the purpose of accessibility. For folks without the ability to use a mouse, they still need some visual indicator that they currently have a link active (so, for example, they can press enter to navigate to that link).
You can try it for yourself by clicking on a link and mousing off of that link before letting go. Or, turn on the “Always use the cursor keys to navigate within page” preference, navigate the cursor around, and see the links become outlined.

Usually, this default styling isn’t a big deal. Links are normally active for only a split second before a new page is loaded and the outline is gone. However, there are circumstances where you want to remove this outline.
Bear in mind that this styling literally uses the “outline” CSS property. Outline is very similar to the “border” property, with two important differences. One, outline goes around the entire object (much like using just “border”), but you may not be specific about sides. “Outline-left” does not exist. Two, the outline value is not a part of the box model. Border is calculated into the total width of the box, whereas outline is not. This is important so that layouts don’t get bumped around when the outline is applied and removed.
How to remove it
If you want it gone, and you want it gone on every single anchor link, just include this as a part of your CSS reset:a {
outline: none;
}Make sure to add in new focus styles
Because that outline was providing an important accessibility feature, you should really (really) consider adding back in a style for your links focus and active states. Personally, I just like to make them the same as the hover state. It’s about the same thing, as far as actual function. Whatever your hover state is, even if it’s shifting a background image or changing size or whatever, can be joined with the active and focus states. Like so:a:hover, a:active, a:focus {
// styling for any way a link is about to be used
}Removing Dotted border for Form Buttons:
<input type="submit" name="Submit" onfocus="blur()" value="Submit" />
Monday, December 28, 2009
Navigation with ICONS
n every internet application I build – within and out with Zen Elements – I attempt to stay away from creating menus made entirely from images. In my oppinion, text within a menu system should be just that; text. This will result in a more crisp, sharp and legible menu, regardless of the application reading it, the magnification of the page, etc. Maybe it is just me but should we not be able to create good looking AND accessible menus?
Below is the Markup and CSS used to create the following Icon Supported Menu.

Click here for a live example (opens in a new window).
.nav li {float:left; width:125px; height:50px; display:inline; padding:0px; margin:0px 25px 0px 0px;}
li.home {background:url(img/nav-home.gif) top left no-repeat;}
li.home:hover {background:url(img/nav-homeHover.gif) top left no-repeat;}
li.about {background:url(img/nav-about.gif) top left no-repeat;}
li.about:hover {background:url(img/nav-aboutHover.gif) top left no-repeat;}
li.work {background:url(img/nav-work.gif) top left no-repeat;}
li.work:hover {background:url(img/nav-workHover.gif) top left no-repeat;}
.nav li a {display:block; padding:15px 0px 0px 50px; color:#000; font-size:18px; font-family:arial; height:35px; text-decoration:none;}
.nav li a:hover {color:#C00;}
******************************************************************************

With menus becoming more heavily styled in keeping with more sophisticated website designs, it is fair to say that if you are wanting to use a particular font – and there is NO way a web compliant one will do – then you are going to have to use images, flash or magic of some sort. It is important to at least try to retain some level accessibility though, as much as possible. Pretty will only get you so far ;)
Below is the Markup and CSS used to create the following Icon Supported Menu.

Click here for a live example (opens in a new window).
The Basic Markup
- navigation.html
- <ul class="nav">
- <li class="home"><a href="#link">home</a></li>
- <li class="about"><a href="#link">about</a></li>
- <li class="work"><a href="#link">work</a></li>
- </ul>
The CSS
style.css.nav {width:550px; height:50px; padding:0px 25px; margin:0px; background:url(img/bg.gif) repeat-x; border:1px solid #efefef;}.nav li {float:left; width:125px; height:50px; display:inline; padding:0px; margin:0px 25px 0px 0px;}
li.home {background:url(img/nav-home.gif) top left no-repeat;}
li.home:hover {background:url(img/nav-homeHover.gif) top left no-repeat;}
li.about {background:url(img/nav-about.gif) top left no-repeat;}
li.about:hover {background:url(img/nav-aboutHover.gif) top left no-repeat;}
li.work {background:url(img/nav-work.gif) top left no-repeat;}
li.work:hover {background:url(img/nav-workHover.gif) top left no-repeat;}
.nav li a {display:block; padding:15px 0px 0px 50px; color:#000; font-size:18px; font-family:arial; height:35px; text-decoration:none;}
.nav li a:hover {color:#C00;}
******************************************************************************

<style type="text/css">

 .nav {width:550px; height:100px; padding:0px 25px; margin:0px; background:url(img/bg.gif) repeat-x; border:1px solid #efefef;}
 .nav li {float:left; width:100px; height:100px; display:inline; padding:0px; margin:0px 25px 0px 0px;}
   li.home {background:url(img/nav-home.gif) top center no-repeat;}
   li.home:hover {background:url(img/nav-homeHover.gif) top center no-repeat;}
   li.about {background:url(img/nav-about.gif) top center no-repeat;}
   li.about:hover {background:url(img/nav-aboutHover.gif) top center no-repeat;}
   li.work {background:url(img/nav-work.gif) top center no-repeat;}
   li.work:hover {background:url(img/nav-workHover.gif) top center no-repeat;}
 .nav li a {display:block; padding:50px 0px 0px 0px; color:#000; font-size:18px; font-family:arial; height:35px; text-decoration:none; text-align:center}
 .nav li a:hover {color:#C00;}
</style>
The Basic Markup
- navigation.html
- <ul class="nav">
- <li class="home"><a href="#link">home</a></li>
- <li class="about"><a href="#link">about</a></li>
- <li class="work"><a href="#link">work</a></li>
- </ul>
With menus becoming more heavily styled in keeping with more sophisticated website designs, it is fair to say that if you are wanting to use a particular font – and there is NO way a web compliant one will do – then you are going to have to use images, flash or magic of some sort. It is important to at least try to retain some level accessibility though, as much as possible. Pretty will only get you so far ;)
Tuesday, December 22, 2009
16 Free JavaScript Solutions for Displaying Your Images
If you’re looking for a way to display your images on a website but don’t have the time to create a custom solution, there’s plenty of free and easy-to-use scripts available at your disposal.
Here, I’ve compiled 16 free image galleries and slideshows for you to take a look at. Though the effects are smooth and their features are robust, none of them use Flash, only JavaScript, and they require very little coding on your part.

SmoothGallery demo
(E)2 Photo Gallery demo


Highslide JS demo


Galleria demo 1 – Galleria demo 2

LightWindow v2.0 demos


Image Transition Manager demo


ProtoFlow demo


minishowcase demo
Here, I’ve compiled 16 free image galleries and slideshows for you to take a look at. Though the effects are smooth and their features are robust, none of them use Flash, only JavaScript, and they require very little coding on your part.
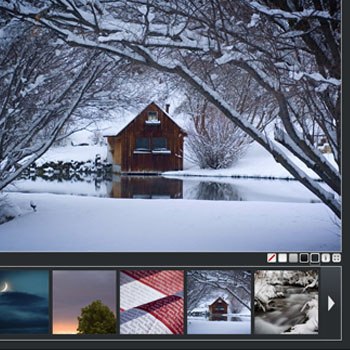
1. JonDesign’s SmoothGallery 2.0
SmoothGallery 2.0 is a nifty slideshow gallery that transitions between images very… smoothly. The author tested SmoothGallery 2.0 in Firefox, Opera, IE 6 and 7, and Safari. It requires the mootools JavaScript framework.SmoothGallery demo
2. (E)2 Photo Gallery
(E)2 Photo Gallery is an open source photo gallery. The current version is still in beta but I’ve tested it to work with Firefox 2, IE 7, and Safari 3. What’s cool about (E)2 Photo Gallery is that the user can change the "skin" of the gallery. It uses the mootools framework and PHP for the photo uploader and image auto-detection features. (E)2 Photo Gallery demo
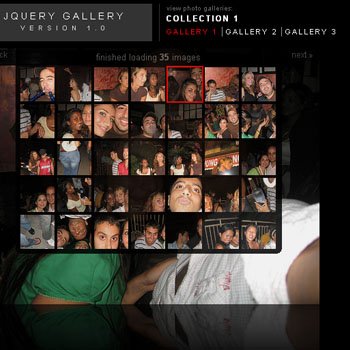
3. jQuery Gallery
jQuery Gallery is a plugin for the jQuery JavaScript library. It uses the Reflection.js script to add a reflection effect dynamically to your images.4. MooPix
MooPix utilizes the Flickr API to dynamically populate your image gallery with pictures from a Flickr account without the need to use server-side scripting.5. Highslide JS
Highslide JS is an open source script that uses modal windows instead of pop-up windows to open larger versions of the thumbnail images. It’s free for non-commercial uses.Highslide JS demo
6. Flickrshow
Flickrshow is another slideshow that allows you to access photosets, groups, and tags from Flickr. The current version has an improved caching feature which helps make the transition between images quicker and more fluid.7. Galleria
Galleria is an image gallery that uses the jQuery library. It’s distributed under the GLP 3.0 License which permits you to modify and re-package the script (granted that you abide by the terms and conditions of the license).Galleria demo 1 – Galleria demo 2
8. LightWindow v2.0
LightWindow 2.0 is an excellent choice for mixed media galleries because it also supports other file types such as Flash movies and video files.LightWindow v2.0 demos
9. easyALBUM
easyALBUM prides itself for being an image gallery that uses "super clean markup". It works well with CSS disabled and is compliant with current XHTML web-standards. It also allows the user to navigate through the gallery using keyboard shortcuts.10. slideViewer
slideViewer is a plugin for jQuery and uses ordered lists for mark-up which is good for accessibility and with JavaScript turned off.11. Image Transition Manager
Image Transition Manager provides you 8 transition effects. It was tested by the developer in Firefox 2, Opera, and IE 6 and 7. As an additional measure, I tried it in Safari 3 (and it works). It was developed using the script.aculo.us effects library which in turn requires the Prototype JS framework.Image Transition Manager demo
12. ThickBox
ThickBox is a script built on top of jQuery. It’s designed to display images as well as other types of document objects. It has the capability of loading content via Ajax requests.13. ProtoFlow
ProtoFlow mimics the cover flow effect that you would find in iTunes, the iPhone, and other Apple products. In addition to the ProtoFlow JS and CSS file, it also uses three additional external JavaScript files – Prototype and script.aculo.us and Reflection.js – so make sure you’re willing to pay the price in page weight, additional HTTP requests, and potential decrease in page load times due to the above reasons.ProtoFlow demo
14. Slideshow: A Javascript class for Mootools
Slideshow gives you tons of options and effects for your slideshow gallery. There’s a pan/zoom feature that makes for a very impressive transition between images, all entirely done using JavaScript. It doesn’t come pretty "out of the box", but with some simple CSS magic, it can looks awesome!15. Javascript Image Gallery Using Mootools
This is a very simple image gallery, great for when you need something up right now. It doesn’t require you to know very much JavaScript to get it to work.16. minishowcase
minishowcase gives you the ability to set the language used in your galleries, and it can be configured to detect the user’s language preferences. This image gallery uses PHP for the language selection and automatic thumbnail generation.minishowcase demo
JavaScript Debugging Techniques in IE 6
Microsoft’s Internet Explorer 6 is almost universally hated by web developers. It’s hard to work with and support, but with a few solid techniques, you can make the process less painful. What “just works” in the majority of browsers will almost always require hours of tweaks and workarounds to get it working in IE6. With more and more users switching over to newer alternatives such as IE8, Safari and Firefox hopefully support for IE6 can be dropped sooner rather than later. In the mean time though many of us have to make sure our sites work in this awful browser.
To make things worse, IE6 is extremely bad at helping developers diagnose problems. When a JavaScript error occurs, IE6’s default behaviour is to display a small error icon in the status bar. Extremely easy to miss!

Double clicking on this icon will display a popup, and if you then click the “Show Details” button you’ll get the actual details of the JavaScript error. Unfortunately the detailed error message can be quite cryptic, and probably not too much help in diagnosing the actual problem. Your best bet is to make a note of the line and column number of the problem and then look that up in the source code. Fortunately, with the help of Visual Studio and by changing a few IE settings, we can make it much easier on ourselves.
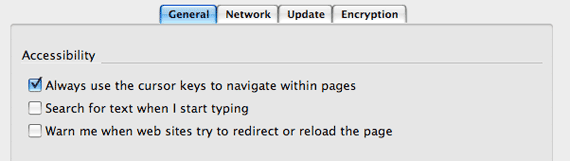
Script debugging in IE needs be enabled, which requires us to disable the first option out of the three. If you also want to debug scripts in other contexts (such as Outlook) then disable the second option. Enable the third option if you’d like the JavaScript error dialog to pop up automatically instead of being displayed as a small icon in the status bar.

After changing those settings and restarting IE, we’re ready to start debugging. All of the following examples show Visual Studio 2005, but the same applied to 2008. You can also use the free Web Developer Express Edition if you don’t own a full copy of Visual Studio. Instead of IE prompting you to open the debugger, as it does in the examples below, you’ll first need to create a project and then start the debugger yourself. From that point on everything is the same.

Selecting Visual Studio and clicking the yes button will open Visual Studio and highlight the code that is the cause of the problem.

For relatively simple errors, such as the one in the example above, just seeing the actual cause of the error highlighted is probably enough for us to work out what has gone wrong, and how to fix it. In more complex cases, however, we’ll need more information. This where the Visual Studio debugging features come in really handy.
In the code below we have a function, performAction, which takes a function as an argument and calls that function once it’s done. You’ll commonly see this sort of thing in JavaScript with asynchronous functions such as setTimeout and jQuery’s Get. There is a problem with the code below though: We’re accidentally passing in a string to performAction rather than a function.
With the locals window displayed it’s clear that the problem is that callback is a string, rather than a function. The locals window doesn’t just support basic types such as integers and strings. If you’ve got a local object you can look at all of its properties and see the value and type of each of them, as we’ll see in the next example.
In a large project it can be difficult to track down why a property we expect to exist is undefined. Instead of trawling through lots of code we can simply add the line “debugger;” above the alert statement. IE will then automatically prompt us to debug the code in Visual Studio when it hits that line. From the locals window we can see that the ‘message’ property has been misspelt.
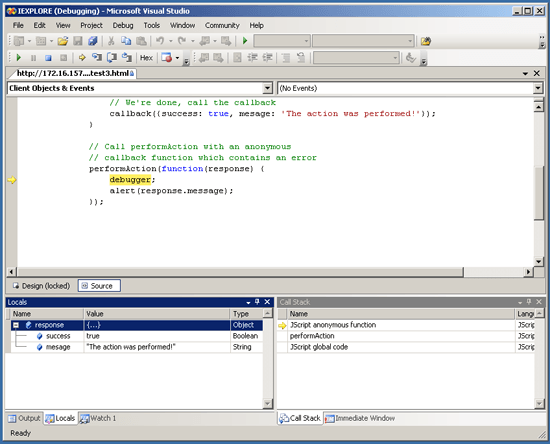
Using the call stack window, which can be accessed in the same way we accessed the locals window, shown at the bottom right of the above screenshot we can work out exactly where this problem occurred. If we double click on the ‘performAction’ line, the previous statement in the call stack, we’ll see the source of the error.
While debugger statements can be a useful tool in helping you track down problems you should be careful not to leave them in your production code!
For these situations we must turn to the immediate window. It is by far the most powerful debugging tool that Visual Studio has to offer, allowing us to evaluate JavaScript expressions on the fly.
The immediate window can be accessed in the same way that we accessed the other windows. Clicking inside the window will give it focus. We can then type JavaScript statements directly into the window and see the result. For example, type “window” followed by enter and you’ll get a print out of everything in the global scope.
When combined with the JavaScript arguments variable we can look in detail at all the current function arguments and the calling function. While the code in the next example isn’t something you’re likely to see in a real project, it does help to demonstrate techniques that can be extremely useful.
Hopefully these examples have conveyed just how powerful the immediate window is.
To make things worse, IE6 is extremely bad at helping developers diagnose problems. When a JavaScript error occurs, IE6’s default behaviour is to display a small error icon in the status bar. Extremely easy to miss!
Double clicking on this icon will display a popup, and if you then click the “Show Details” button you’ll get the actual details of the JavaScript error. Unfortunately the detailed error message can be quite cryptic, and probably not too much help in diagnosing the actual problem. Your best bet is to make a note of the line and column number of the problem and then look that up in the source code. Fortunately, with the help of Visual Studio and by changing a few IE settings, we can make it much easier on ourselves.
Setting things up
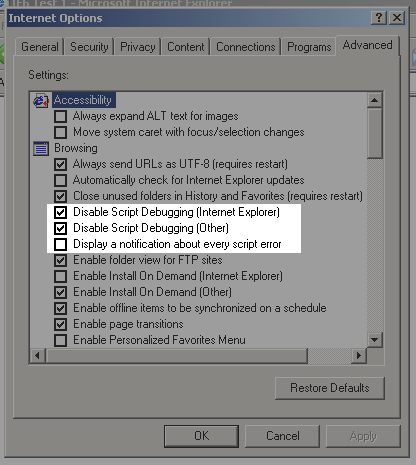
To enable JavaScript debugging in IE we need to change some default settings, which can be accessed from the Tools> Internet Options menu, and then the Advanced tab. The image below shows the default IE6 settings, with the three settings we’re interested in highlighted.Script debugging in IE needs be enabled, which requires us to disable the first option out of the three. If you also want to debug scripts in other contexts (such as Outlook) then disable the second option. Enable the third option if you’d like the JavaScript error dialog to pop up automatically instead of being displayed as a small icon in the status bar.
After changing those settings and restarting IE, we’re ready to start debugging. All of the following examples show Visual Studio 2005, but the same applied to 2008. You can also use the free Web Developer Express Edition if you don’t own a full copy of Visual Studio. Instead of IE prompting you to open the debugger, as it does in the examples below, you’ll first need to create a project and then start the debugger yourself. From that point on everything is the same.
Basic debugging
Let’s start with a simple example. The code below tries to call a function that doesn’t exist:<script type="text/JavaScript"> functionDoesNotExist(); </script>Now when we load that up into the browser instead of the tiny icon in the status bar IE will prompt us to open a debugger.
Selecting Visual Studio and clicking the yes button will open Visual Studio and highlight the code that is the cause of the problem.
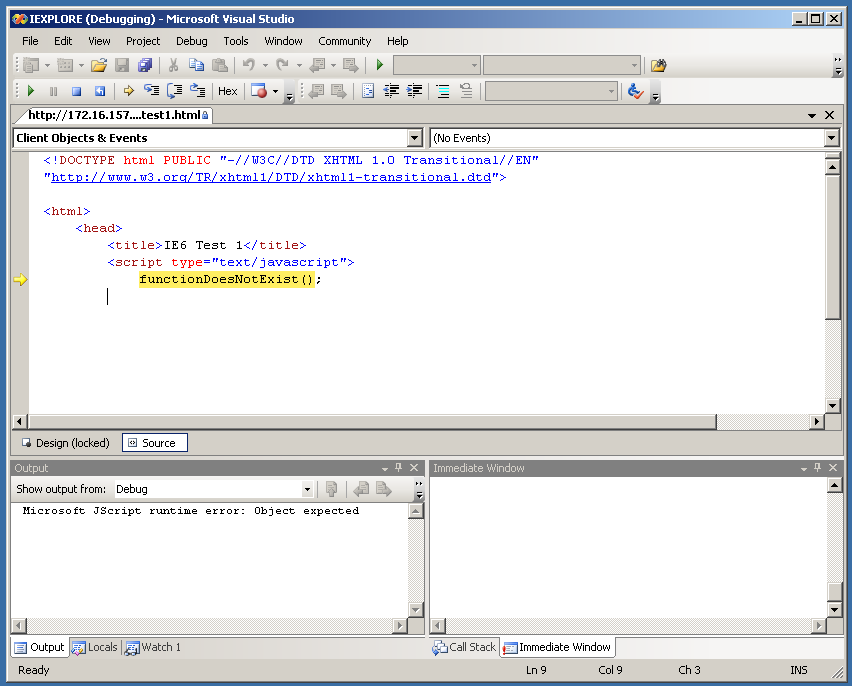
For relatively simple errors, such as the one in the example above, just seeing the actual cause of the error highlighted is probably enough for us to work out what has gone wrong, and how to fix it. In more complex cases, however, we’ll need more information. This where the Visual Studio debugging features come in really handy.
In the code below we have a function, performAction, which takes a function as an argument and calls that function once it’s done. You’ll commonly see this sort of thing in JavaScript with asynchronous functions such as setTimeout and jQuery’s Get. There is a problem with the code below though: We’re accidentally passing in a string to performAction rather than a function.
<script type="text/JavaScript">
  /**
   * Perform an imaginary action, and then
   * call the callback function once we're done
   */
  function performAction(callback) {
  // Perform an action here
  // ...
  // We're done, call the callback
     callback();
}
  // Call performAction with an anonymous
  // callback function which contains an error
  var myFunc = "this is a string, not a function!";
  performAction(myFunc);
</script>
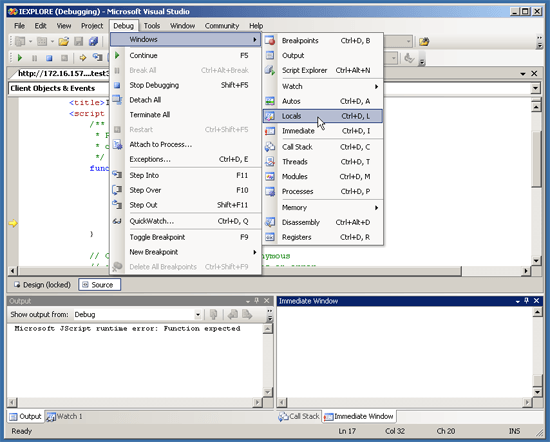
If we load up the code in IE and then debug it in Visual Studio as we have before we’ll see that the code “callback();” is highlighted, and is therefore the cause of problem. It won’t be obvious why this line is causing the problem though, not unless we know what the value of callback is. If callback was actually a function then there wouldn’t be a problem at all. The problem has only arisen because we accidentally passed in a string. This is where the “locals” window comes in handy. It lists all local variables along with their value and type. To display this window go to the Debug menu, then Windows, and then select Locals.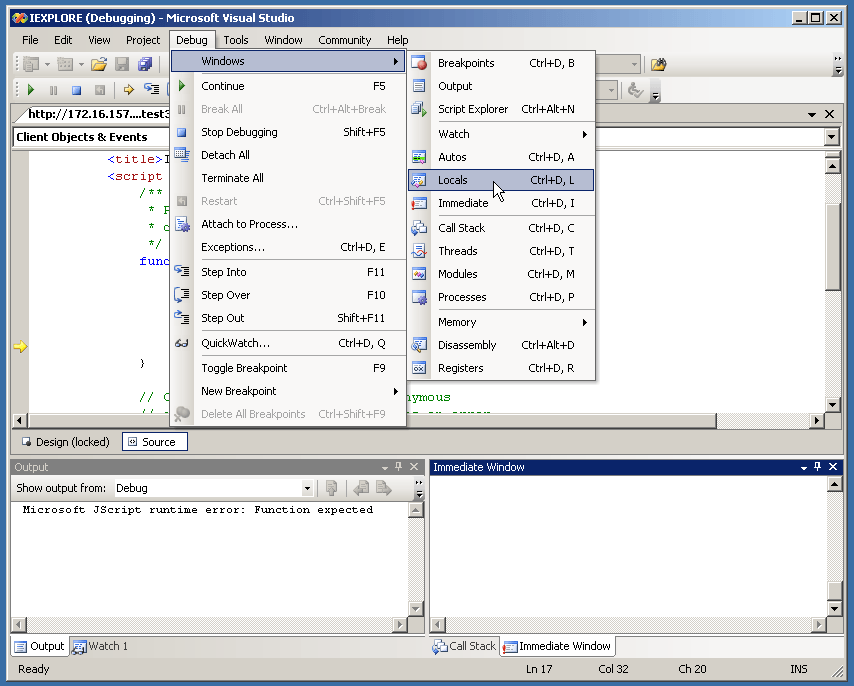
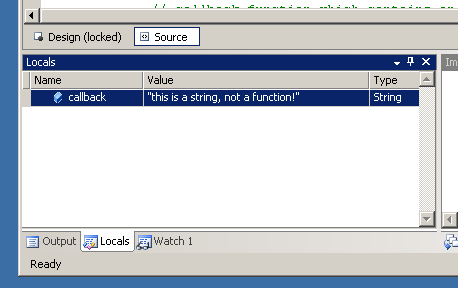
With the locals window displayed it’s clear that the problem is that callback is a string, rather than a function. The locals window doesn’t just support basic types such as integers and strings. If you’ve got a local object you can look at all of its properties and see the value and type of each of them, as we’ll see in the next example.
The ‘debugger’ keyword
The ‘debugger’ keyword, also supported by the Firefox JavaScript debugger Firebug, can really help us to track down problems. Below is a slightly modified version of the previous example, where this time the callback function is passed an object that should include a status and message property. The message property has been misspelled though:<script type="text/JavaScript">
/**
* Perform an imaginary action, and then
* call the callback function once we're done
*/
function performAction(callback) {
// Perform an action here
// ...
// We're done, call the callback
callback({success: true, mesage: 'The action was performed!'});
}
// Call performAction with an anonymous
// callback function which contains an error
performAction(function(response) {
alert(response.message);
});
</script>
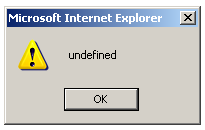
Because ‘message’ has been misspelt as ‘mesage’ in the performAction function when we run this code in IE we’ll see a popup alert with the message “undefined”, rather than the actual message we were hoping to see.In a large project it can be difficult to track down why a property we expect to exist is undefined. Instead of trawling through lots of code we can simply add the line “debugger;” above the alert statement. IE will then automatically prompt us to debug the code in Visual Studio when it hits that line. From the locals window we can see that the ‘message’ property has been misspelt.
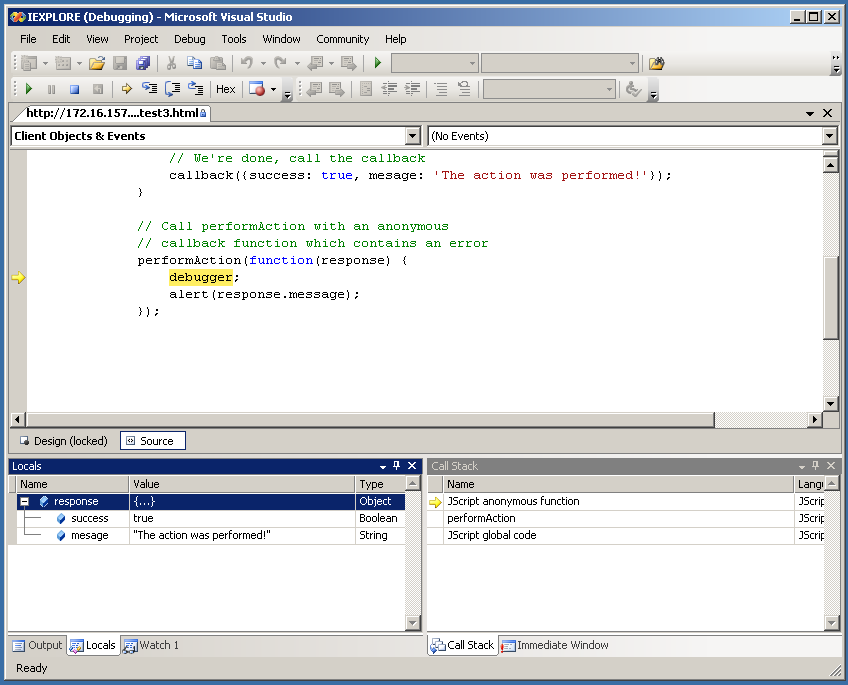
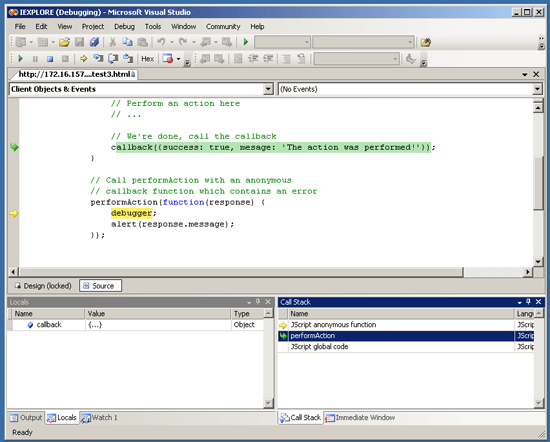
Using the call stack window, which can be accessed in the same way we accessed the locals window, shown at the bottom right of the above screenshot we can work out exactly where this problem occurred. If we double click on the ‘performAction’ line, the previous statement in the call stack, we’ll see the source of the error.

While debugger statements can be a useful tool in helping you track down problems you should be careful not to leave them in your production code!
More advanced debugging
So far we’ve covered some basic examples, such as calling non-existent functions and undefined properties. Using the locals and call stack windows it was relatively straight forward to track these issues down. There are times when the techniques we’ve discussed so far can’t help though. We can’t see what global variables exist or what value they have with the locals window, for example, and the call stack doesn’t always handle remotely loaded or dynamically executed code very well.For these situations we must turn to the immediate window. It is by far the most powerful debugging tool that Visual Studio has to offer, allowing us to evaluate JavaScript expressions on the fly.
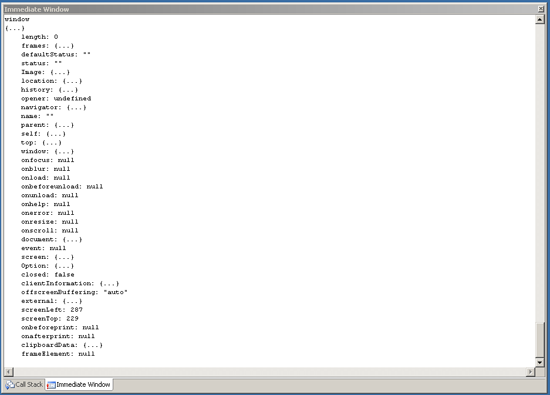
The immediate window can be accessed in the same way that we accessed the other windows. Clicking inside the window will give it focus. We can then type JavaScript statements directly into the window and see the result. For example, type “window” followed by enter and you’ll get a print out of everything in the global scope.
When combined with the JavaScript arguments variable we can look in detail at all the current function arguments and the calling function. While the code in the next example isn’t something you’re likely to see in a real project, it does help to demonstrate techniques that can be extremely useful.
<script type="text/JavaScript">
  /**
   * This function takes a variable number of arguments.
   */
  function performAction() {
    // We're just interested in the immediate
    // window, start the debugger
    debugger;
  }

  // Call performAction with 4 different arguments, each of a different type
  performAction('argument 1', 2, {argument: 3}, function() { return 4; });
</script>
We’ll load this up into IE and then go straight to the immediate window once we’ve opened up the debugger. If we type “arguments” followed by enter we’ll see the following information displayed:arguments
{...}
[0]: "argument 1"
[1]: 2
[2]: {...}
caller: null
length: 4
The “{…}” tells us that arguments is an object. We also see this next to [2], so we know that the third argument (in array position 2) is an object. We can see what properties this object has by simply typing its name into the window:arguments[2]
{...}
argument: 3
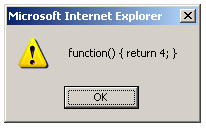
The fourth argument wasn’t listed in the original output because it’s a function. We know it exists though because the length property tells us that there are 4 arguments. We can also confirm it is there using typeof:typeof arguments[3] "function"Unfortunately the immediate window isn’t quite so helpful with functions as it is objects, and if we type in the name of the function we just see “{…}” rather than any details of the function itself. Fortunately there is a handy workaround. If we type “alert(arguments[3]);” then the function code will be displayed in an alert dialog:
Hopefully these examples have conveyed just how powerful the immediate window is.
10 useful Simple jQuery Tricks
There are plenty of jQuery tricks and techniques out there, and the vast and powerful jQuery library can meet almost anyone’s JavaScript’ing needs. Since jQuery makes JavaScript accessible to designers who want to add simple interaction and visual techniques into their design without knowing extensive programming knowledge, it’s worth a few moments to explore this excellent library.
As any designer knows, adding small bits of extra visual detail and user-friendliness can add professionalism and appeal to any web design. In addition, for designers that sell templates, WordPress themes, and other types of web designs, the use of jQuery in a design can be a great selling point.
Let’s take a look at ten simple, effective, and useful tricks and techniques from several excellent jQuery developers and sites around the web that leverage the library to take your designs to another level.
Columns with equal heights have always been a problem for designers using
The function and snippets for this approach is from CSSNewbie. If anyone would like more insight to how the function works, it’s all there.
To solve this problem with jQuery, just add this function to your pages you wish to have equal heights (or include it as a JavaScript file – which is better for maintainability).
Many designers know how to create rounded corners using CSS, HTML, and a bunch of images, but these techniques cause a lot of HTML/CSS clutter.
Below is an example of some cluttered HTML used to create rounded corners.
A solution to our problem is simple though – instead of writing all of the extra HTML
This useful technique is from Day 13 of the 15 Days of jQuery site. For a full tutorial or more detail on how it works, head on over there.
By utilizing the script below, we can automatically add the extra
Here’s a sample
Below is an example of a jQuery plugin called Scrollable (check out the demo on that page to see the plugin in action).
There are tons of plugins and tutorials on the web for how to create scrollable content, the Scrollable plugin being one of them.
To help you scroll up and down a web page in an animated way, check out the tutorial called Scroll window smoothly in jQuery on Freelancer ID Blog.
In order to tell jQuery to scroll, we need a section in a web page to scroll up or down to (
Example of a input button:
It’s quite easy to do (really). Include the following jQuery script to the
Using links to increase, decrease, or reset the text size of a webpage can easily be implemented using jQuery.
The following snippet from Queness will do the trick.
From there, we can use basic HTML to create text-resizing links.
Designers can create accordion menus with some pretty cool animation effects using jQuery.

To view a demo of an accordion in action, check out the accordion over on WebDesignerWall.
Using the jQuery script below, we can use a mixture of
Below is the HTML we need to use. As you can see, it’s pretty straightforward and all we need to have is the
The image above is actually an example of a demo page in action (from CSSGlobe). To download this script set, head on over to their write-up of it called Easiest Tooltip and Image Preview Using jQuery.
Here is the HTML markup you need, which, as you can see follows unobtrusive JavaScript best practices by using a class (
A dialog box like this takes more than just a few snippets of code, it takes an entire tutorial. Above is an image of what the NetTuts+ tutorial for creating a modal dialog box can do. It is a great tutorial to follow if you would like to make your own, and customize it along the way.
FancyZoom
Wordpress jQuery Lightbox Plugin

SimpleModal

Basically, jQuery UI extends the jQuery core library to give you access to useful and common UI components (widgets) such as date pickers, accordion, tabs, sliders, and more.
To make things easier for designers wanting to save time and coding requirements, they have provided a nifty tool for quickly testing and creating your own jQuery UI themes, aptly called ThemeRoller, (which is also available as a Firefox bookmarklet).
Needless to say that there are plenty of features that come from jQuery UI that let designers "Code Less, Do More."
Please share any additional plugins, tutorials, and jQuery tricks that may help your fellow web designers in the comments.
As any designer knows, adding small bits of extra visual detail and user-friendliness can add professionalism and appeal to any web design. In addition, for designers that sell templates, WordPress themes, and other types of web designs, the use of jQuery in a design can be a great selling point.
Let’s take a look at ten simple, effective, and useful tricks and techniques from several excellent jQuery developers and sites around the web that leverage the library to take your designs to another level.
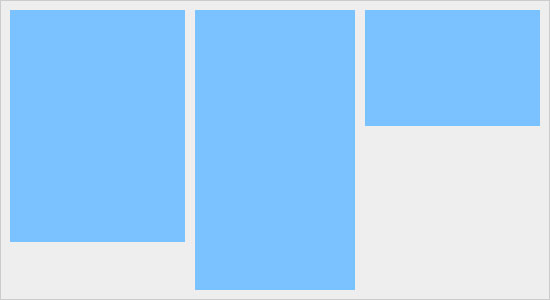
1. Equal-Height Columns
Columns with equal heights have always been a problem for designers using
divs, although now, there are quite a few solutions. Among the solutions available to you is using jQuery. This technique only requires a very small JavaScript function to handle everything, then some basic integration with the main layout to make the magic happen.The function and snippets for this approach is from CSSNewbie. If anyone would like more insight to how the function works, it’s all there.
To solve this problem with jQuery, just add this function to your pages you wish to have equal heights (or include it as a JavaScript file – which is better for maintainability).
function equalHeight(group) {
  tallest = 0;
  group.each(function() {
    thisHeight = $(this).height();
    if(thisHeight > tallest) {
      tallest = thisHeight;
    }
  });
  group.height(tallest);
}
To get equal-height columns, link to the script that contains the function, and put the following code block below in the <head> tags of your pages.<script type="text/javascript">
$(document).ready(function(){
equalHeight($(".col1"));
equalHeight($(".col2"));
equalHeight($(".col3"));
});
</script>The code will execute as soon as the DOM is ready to be utilized, ($(document).ready(function()) and then uses the equalHeight function to accurately calculate the height of all the columns. As one can see, all a designer needs to do is use divs with classes of col1, col2, and col3 to make this example work properly.2. Rounded corners without the HTML mess
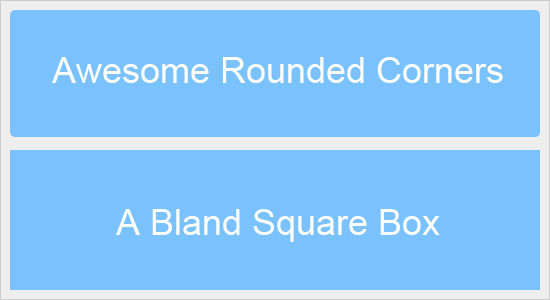
Fortunately, CSS3 has come out with a way to create rounded corners automatically without using images, but on the other hand, many popular browsers (such as Internet Explorer) may take a while before it fully/partially supports CSS3 W3C recommendations.Many designers know how to create rounded corners using CSS, HTML, and a bunch of images, but these techniques cause a lot of HTML/CSS clutter.
Below is an example of some cluttered HTML used to create rounded corners.
<div class="roundedbox">
  <div class="hd">
  <div class="c"></div>
</div>
<div class="bd">
  <div class="c">
    <div class="s">
      <-- main content goes here -->
    </div>
  </div>
</div>
<div class="ft">
  <div class="c"></div>
</div>
</div>
That’s quite a lot of code for one rounded box. Most designers know that it can be difficult to sift though HTML code like this, especially when trying to alter a page that use several rounded corners.A solution to our problem is simple though – instead of writing all of the extra HTML
divs each time we need a new rounded box, we can simply have jQuery do all the work for us (by way of DOM manipulation).This useful technique is from Day 13 of the 15 Days of jQuery site. For a full tutorial or more detail on how it works, head on over there.
By utilizing the script below, we can automatically add the extra
divs where needed.<script type="text/javascript">
$(document).ready(function(){
$("div.roundbox").wrap('
<div class="roundedbox">'+
' <div class="bd">'+
' <div class="c">'+
' <div class="s">'+
' </div>'+
' </div>'+
' </div>'+
'</div>');
});
</script>The use of div.roundbox in the snippet above is key. Now, instead of writing out all of those divs every time we need to create a new rounded box, all we have to do is use the class roundbox; jQuery will traverse the DOM to find all elements that has that class value and will automatically wrap it around div’s.Here’s a sample
div HTML structure:<div class="roundbox"> <-- main content goes here --> </div>Of course, you’ll still have to use some CSS to get the rounded corner images to work, and Jack Born of 15 Days of jQuery provides you with a downloadable package that includes the auxiliary source files you’ll need.
3. Scrolling Content
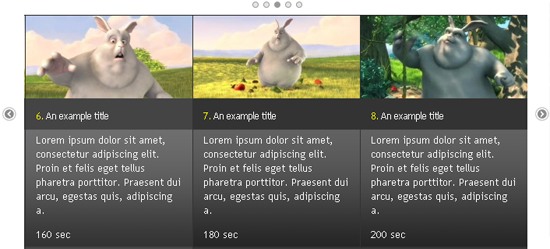
Animated scrolling in jQuery can be used to create image carousels and to simplify a design by being able to display more content in a smaller space.Below is an example of a jQuery plugin called Scrollable (check out the demo on that page to see the plugin in action).
There are tons of plugins and tutorials on the web for how to create scrollable content, the Scrollable plugin being one of them.
To help you scroll up and down a web page in an animated way, check out the tutorial called Scroll window smoothly in jQuery on Freelancer ID Blog.
In order to tell jQuery to scroll, we need a section in a web page to scroll up or down to (
ScrollTarget).<div class="ScrollTarget"> <p>After a scroll button is clicked, jQuery will animate the page to this point.</p> </div>Next, we can use any HTML element to use as a trigger to call a function called
scroll(), such as an image or input button to tell the browser to scroll to the above div when clicked.Example of a input button:
<input onclick="scoll();" type="button" value="Scroll" />Example of an image:
<img onclick="scoll();" src="images/scroll.jpg" alt="Scroll" />Here is the code for the
scroll() function.function scroll(){
$('html, body').animate({
scrollTop: $(".ScrollTarget").offset().top
}, 2000);
}The downside to this technique is that it uses an onclick property which is bad practice if you’re interested in obeying unobtrusive JavaScript principles. So, you can modify the element’s markup in such a way that it has a class property value of, for example, scrollTrigger:<input class="scrollTrigger" type="button" value="Scroll" />And then simply replace the above
scroll() function to this script below:$('.scrollTrigger').click(function(){
$('html, body').animate({
scrollTop: $(".ScrollTarget").offset().top
}, 2000);
});
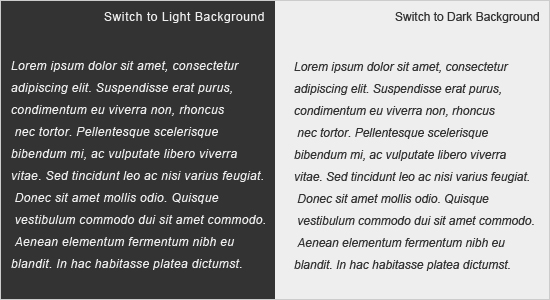
4. CSS Style Switcher
Switching themes is a great way to vary the theme and look of a web page. Switching stylesheets may be necessary to accommodate different screen resolutions, or perhaps to allow users to pick a light background alternative to a dark design.It’s quite easy to do (really). Include the following jQuery script to the
<head> of your HTML file.<script type="text/javascript">
$(".styleswitch").click(function() {
$('link[rel=stylesheet]').attr('href' , $(this).attr('rel'));
});
</script>To give options to the user for switching styles, just assign the styleswitch class to an HTML element (a elements would be good candidates), using the rel attribute to reference the location of your stylesheets.<a href="#" class="styleswitch" rel="dark.css">Dark</a> <a href="#" class=" styleswitch " rel="light.css">Light</a>For example, if this is how you reference your default stylesheet:
<link rel="stylesheet" href="dark.css" type="text/css">Clicking on the second link above will modify the DOM in such a way that the
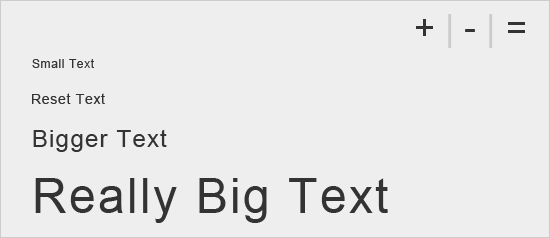
href attribute will take on the value of light.css.5. Resizing text dynamically
This common trick among designers can make it easy for users to control how big or small they see the text on a web page without having to modify their web browser settings.Using links to increase, decrease, or reset the text size of a webpage can easily be implemented using jQuery.
The following snippet from Queness will do the trick.
<script type="text/javascript">
$(document).ready(function(){
  var section = new Array('span','.section2');
  section = section.join(',');

  // Reset Font Size
  var originalFontSize = $(section).css('font-size');
  $(".resetFont").click(function(){
    $(section).css('font-size', originalFontSize);
  });

  // Increase Font Size
  $(".increaseFont").click(function(){
    var currentFontSize = $(section).css('font-size');
    var currentFontSizeNum = parseFloat(currentFontSize, 10);
    var newFontSize = currentFontSizeNum*1.2;
    $(section).css('font-size', newFontSize);
    return false;
  });

  // Decrease Font Size
  $(".decreaseFont").click(function(){
    var currentFontSize = $(section).css('font-size');
    var currentFontSizeNum = parseFloat(currentFontSize, 10);
    var newFontSize = currentFontSizeNum*0.8;
    $(section).css('font-size', newFontSize);
    return false;
  });
});
</script>
In the code above, you will notice an array called section. This defines which HTML elements can be resized.From there, we can use basic HTML to create text-resizing links.
<a class="increaseFont">+</a> | <a class="decreaseFont">-</a>
| <a class="resetFont">=</a>

<span>Font size can be changed in this section</span>
<div class="section1">This won't be affected</div>
<div class="section2">This one is adjustable too!</div>
6. Animated accordions for interactive content displays
Accordions that use jQuery can take on many forms, from displaying only necessary content, to creating expandable/collapsible navigation menus.Designers can create accordion menus with some pretty cool animation effects using jQuery.
To view a demo of an accordion in action, check out the accordion over on WebDesignerWall.
Using the jQuery script below, we can use a mixture of
<h3> and <p> elements to hide and show the paragraphs below the heading tags.<script type="text/javascript">
$(document).ready(function(){
$(".accordion p").hide();
$(".accordion h3").click(function(){
$(this).next("p").slideToggle("slow")
.siblings("p:visible").slideUp("slow");
$(this).toggleClass("active");
$(this).siblings("h3").removeClass("active");
});
});
</script>Note: If you’d like a faster animation movement, modify the slideToggle and slideUp methods so that it passes either the strings 'normal' or 'fast', or simply use an integer in millisecond units (such as .slideUp(500) for a half -second transition).Below is the HTML we need to use. As you can see, it’s pretty straightforward and all we need to have is the
div.accordion element, and <h3>/<p> pairs inside it.<div class="accordion"> <h3>Item One</h3> <p>Lorem ipsum dolor sit amet.</p> <h3>Item Number Two</h3> <p>Lorem ipsum dolor sit amet.</p> <h3>Here is Item Three</h3> <p>Lorem ipsum dolor sit amet.</p> </div>Take a closer look at this and some other jQuery tricks over at WebDesignerWall.
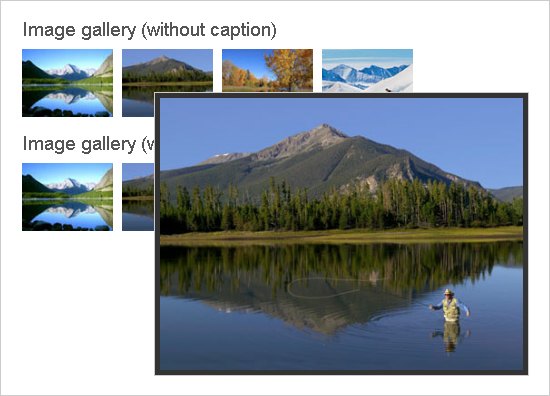
7. Tooltips to convey contextual messages on an element of interest
Tooltips are an easy way to give users more information when they hover on a particular page element. By hovering over an element of choice, the user can view a simple tooltip that pops up displaying links, content, a larger image, and other contextual information that they might find useful.The image above is actually an example of a demo page in action (from CSSGlobe). To download this script set, head on over to their write-up of it called Easiest Tooltip and Image Preview Using jQuery.
Here is the HTML markup you need, which, as you can see follows unobtrusive JavaScript best practices by using a class (
.preview)to indicate which elements will have tooltips.<a href="image.jpg" class="preview" title="Image">Preview</a>
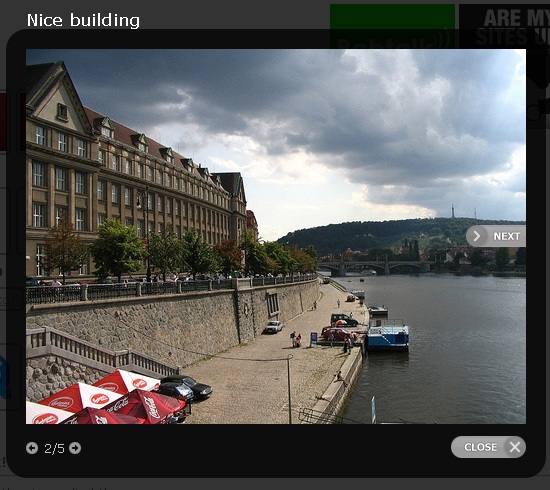
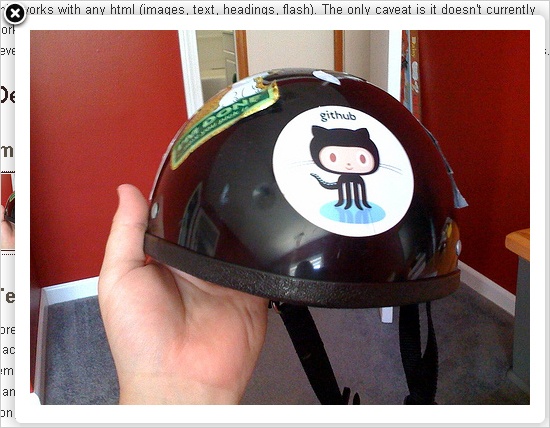
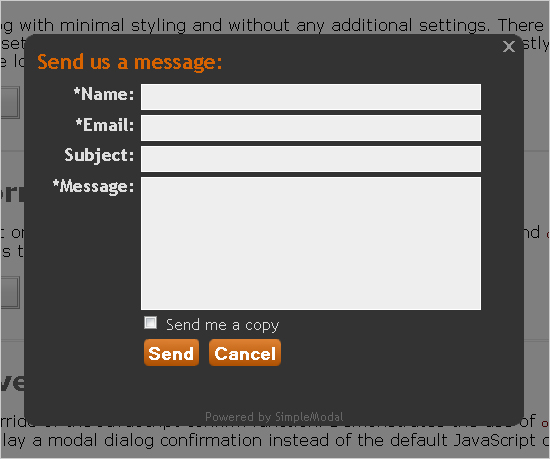
8. Modal windows to replace pop-up windows
Modal windows can be used to display images, content, and even iFrames.A dialog box like this takes more than just a few snippets of code, it takes an entire tutorial. Above is an image of what the NetTuts+ tutorial for creating a modal dialog box can do. It is a great tutorial to follow if you would like to make your own, and customize it along the way.
jQuery Plugins for Modal Windows
Instead of creating your own jQuery script for modal windows, there are plenty of plugins that you can use to get the job done; below are just a few of them.FancyZoom
Wordpress jQuery Lightbox Plugin
SimpleModal
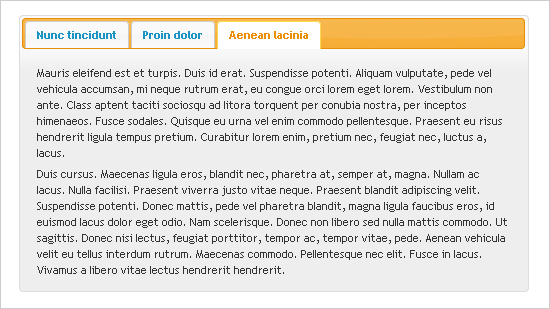
9. Tabbed interfaces for displaying content
Tabs are a great way to save space, just like an accordion. With a rise in minimalist designs, designers need new ways to decrease the space that web page content can take up. Tabs are also a great way to organize information on a web page, making the design much more user-friendly. The image below showcases a tabbed area demonstration using the jQuery UI tabs.10. Using jQuery UI for easy widget implementation
The last "trick" for designers is easy: take a look at (and learn about) the jQuery User Interface (jQuery UI).Basically, jQuery UI extends the jQuery core library to give you access to useful and common UI components (widgets) such as date pickers, accordion, tabs, sliders, and more.
To make things easier for designers wanting to save time and coding requirements, they have provided a nifty tool for quickly testing and creating your own jQuery UI themes, aptly called ThemeRoller, (which is also available as a Firefox bookmarklet).
Needless to say that there are plenty of features that come from jQuery UI that let designers "Code Less, Do More."
Wrapping Up
Many visual effects and impressive interaction can be achieved using jQuery. The above ten tips may be common and incredibly useful, but the power of jQuery does not stop there. I hope that this post has gotten you interested enough to keep exploring and learning more about this designer-friendly JavaScript library.Please share any additional plugins, tutorials, and jQuery tricks that may help your fellow web designers in the comments.
Subscribe to:
Posts (Atom)